
Vue3学习
Vue开发前的准备
安装Vue工具 Vue CLI
Vue CLI Vue.js 开发的标准工具,Vue CLI 是一个基于 Vue.js 进行快速开发的完整系统
1 | npm install -g @vue/cli |
安装之后,你就可以在命令行中访问 vue 命令。你可以通过简单运行 vue,看看是否展示出了一份所有可用命令的帮助信息,来验证它是否安装成功。
1 | vue --version |
创建一个项目
运行以下命令来创建一个新项目
1 | vue create vue-demo |
温馨提示
在控制台中,可以用上下按键调整选择项
在控制台中,可以用空格(spacebar)选择是否选中和取消选中
可以选择默认项目模板,或者选“手动选择特性”来选取需要的特性。
我们选择Babel和Progressive Web App (PWA) Support 两个选项即可
温馨提示
在学习期间,不要选中
Linter / Formatter以避免不必要的错误提示,这个是用来强制检查语法错误的。
Vue目前有两个主流大版本vue2和vue3
配置放在哪里? In dedicated config files 专用配置文件或者 In package.json在package.json文件
将其保存为未来项目的预置? y代表保存,并添加名字,n不保存
运行项目
第一步:进入项目根目录cd vue-demo
第二步:运行npm run serve 启动项目
安装Vue高亮插件
VSCode中安装vetur或者volar都可,前者针对Vue2版本,后者针对Vue3版本
模板语法
文本
数据绑定最常见的形式就是使用“Mustache” (双大括号) 语法的文本插值
1 | <span>Message: {{ msg }}</span> |
一般配合js 中的data()设置数据
1 | export default { |
原始 HTML
双大括号会将数据解释为普通文本,而非 HTML 代码。为了输出真正的 HTML,你需要使用v-html 指令
1 | <p>Using mustaches: {{ rawHtml }}</p> |
1 | data(){ |
属性 Attribute
Mustache 语法不能在 HTML 属性中使用,然而,可以使用 v-bind 指令
1 | <div v-bind:id="dynamicId"></div> |
1 | data(){ |
温馨提示
v-bind:可以简写成:
使用 JavaScript 表达式
在我们的模板中,我们一直都只绑定简单的 property 键值,Vue.js 都提供了完全的 JavaScript 表达式支持
1 | {{ number + 1 }} |
这些表达式会在当前活动实例的数据作用域下作为 JavaScript 被解析。有个限制就是,每个绑定都只能包含单个表达式,所以下面的例子都不会生效。
1 | <!-- 这是语句,不是表达式:--> |
条件渲染
v-if
v-if 指令用于条件性地渲染一块内容。这块内容只会在指令的表达式返回 true 值的时候被渲染。
1 | <p v-if="flag">我是孙猴子</p> |
1 | data() { |
v-else
你可以使用 v-else 指令来表示 v-if 的“else 块”
1 | <p v-if="flag">我是孙猴子</p> |
1 | data() { |
v-show
另一个用于条件性展示元素的选项是 v-show 指令
1 | <h1 v-show="ok">Hello!</h1> |
v-if vs v-show 的区别
v-if 是“真正”的条件渲染,因为它会确保在切换过程中,条件块内的事件监听器和子组件适当地被销毁和重建。
v-if 也是惰性的:如果在初始渲染时条件为假,则什么也不做——直到条件第一次变为真时,才会开始渲染条件块。
相比之下,v-show 就简单得多——不管初始条件是什么,元素总是会被渲染,并且只是简单地基于 CSS 进行切换。
一般来说,v-if 有更高的切换开销,而 v-show 有更高的初始渲染开销。因此,如果需要非常频繁地切换,则使用 v-show 较好;如果在运行时条件很少改变,则使用 v-if 较好
列表渲染
用 v-for 把一个数组映射为一组元素
我们可以用 v-for 指令基于一个数组来渲染一个列表。v-for 指令需要使用 item in items 形式的特殊语法,其中 items 是源数据数组,而 item 则是被迭代的数组元素的别名。
1 | <ul> |
1 | data() { |
维护状态
当 Vue 正在更新使用 v-for 渲染的元素列表时,它默认使用“就地更新”的策略。如果数据项的顺序被改变,Vue 将不会移动 DOM 元素来匹配数据项的顺序,而是就地更新每个元素,并且确保它们在每个索引位置正确渲染。
为了给 Vue 一个提示,以便它能跟踪每个节点的身份,从而重用和重新排序现有元素,你需要为每项提供一个唯一的 key attribute:
1 | <div v-for="(item,index) in items" :key="item.id|index"> |
事件处理
监听事件
我们可以使用 v-on 指令 (通常缩写为 @ 符号) 来监听 DOM 事件,并在触发事件时执行一些 JavaScript。用法为 v-on:click="methodName" 或使用快捷方式 @click="methodName"
1 | <button @click="counter += 1">Add 1</button> |
1 | data() { |
事件处理方法
然而许多事件处理逻辑会更为复杂,所以直接把 JavaScript 代码写在 v-on 指令中是不可行的。因此 v-on 还可以接收一个需要调用的方法名称。
1 | <button @click="greet">Greet</button> |
1 | methods: { |
内联处理器中的方法
这是官方的翻译称呼,其实我们可以直接叫他 “事件传递参数”
1 | <button @click="say('hi')">Say hi</button> |
1 | methods: { |
表单输入绑定
你可以用 v-model 指令在表单 <input>、<textarea> 及 <select> 元素上创建双向数据绑定。它会根据控件类型自动选取正确的方法来更新元素。尽管有些神奇,但 v-model 本质上不过是语法糖。它负责监听用户的输入事件来更新数据,并在某种极端场景下进行一些特殊处理。
1 | <input v-model="message" placeholder="edit me" /> |
1 | data() { |
修饰符
.lazy
在默认情况下,v-model 在每次 input 事件触发后将输入框的值与数据进行同步 。你可以添加 lazy 修饰符,从而转为在 change 事件之后进行同步
1 | <input v-model.lazy="message" /> |
1 | data() { |
.trim
如果要自动过滤用户输入的首尾空白字符,可以给 v-model 添加 trim 修饰符
1 | <input v-model.trim="message" /> |
1 | data() { |
组件基础
单文件组件
Vue 单文件组件(又名 *.vue 文件,缩写为 SFC)是一种特殊的文件格式,它允许将 Vue 组件的模板、逻辑 与 样式封装在单个文件中
1 | <template> |
加载组件
第一步:引入组件 import MyComponentVue from './components/MyComponent.vue'
第二步:挂载组件 components: { MyComponentVue }
第三步:显示组件 <my-componentVue />
组件的组织
通常一个应用会以一棵嵌套的组件树的形式来组织
Props组件交互
组件与组件之间是需要存在交互的,否则完全没关系,组件的意义就很小了
Prop 是你可以在组件上注册的一些自定义 attribute
1 | <my-componentVue title="标题"/> |
1 | <template> |
Prop 类型
Prop传递参数其实是没有类型限制的
1 | props: { |
温馨提示
数据类型为数组或者对象的时候,默认值是需要返回工厂模式
自定义事件组件交互
自定义事件可以在组件中反向传递数据,prop 可以将数据从父组件传递到子组件,那么反向如何操作呢,就可以利用自定义事件实现 $emit
1 | <template> |
1 | <template> |
组件生命周期
每个组件在被创建时都要经过一系列的初始化过程——例如,需要设置数据监听、编译模板、将实例挂载到 DOM 并在数据变化时更新 DOM 等。同时在这个过程中也会运行一些叫做生命周期钩子的函数,这给了用户在不同阶段添加自己的代码的机会
为了方便记忆,我们可以将他们分类:
创建时:beforeCreate、created
渲染时:beforeMount、mounted
更新时:beforeUpdate、updated
卸载时:beforeUnmount、unmounted
Vue引入第三方
Swiper 开源、免费、强大的触摸滑动插件
Swiper 是纯javascript打造的滑动特效插件,面向手机、平板电脑等移动终端
Swiper 能实现触屏焦点图、触屏Tab切换、触屏轮播图切换等常用效果
温馨提示
安装指定版本:
npm instal --save swiper@8.1.6
基础实现
1 | <template> |
添加指示器
1 | <template> |
Axios网络请求
Axios 是一个基于 promise 的网络请求库
安装
Axios的应用是需要单独安装的 npm install --save axios
引入
组件中引入: import axios from "axios"
全局引用:
1 | import axios from "axios" |
网络请求基本示例
get请求
1 | axios({ |
post请求
温馨提示
post请求参数是需要额外处理的
- 安装依赖:
npm install --save querystring- 转换参数格式:
qs.stringify({})
1 | axios({ |
快捷方案
get请求
1 | axios.get("http://iwenwiki.com/api/blueberrypai/getChengpinDetails.php") |
post请求
1 | axios.post("http://iwenwiki.com/api/blueberrypai/login.php", qs.stringify({ |
Axios网络请求封装
在日常应用过程中,一个项目中的网络请求会很多,此时一般采取的方案是将网络请求封装起来
在src目录下创建文件夹utils,并创建文件request,用来存储网络请求对象 axios
1 | import axios from "axios" |
在src目录下创建文件夹api,并创建文件index和path分别用来存放网络请求方法和请求路径
1 | // path.js |
1 | // index.js |
在组件中直接调用网络请求
1 | import api from "../api/index" |
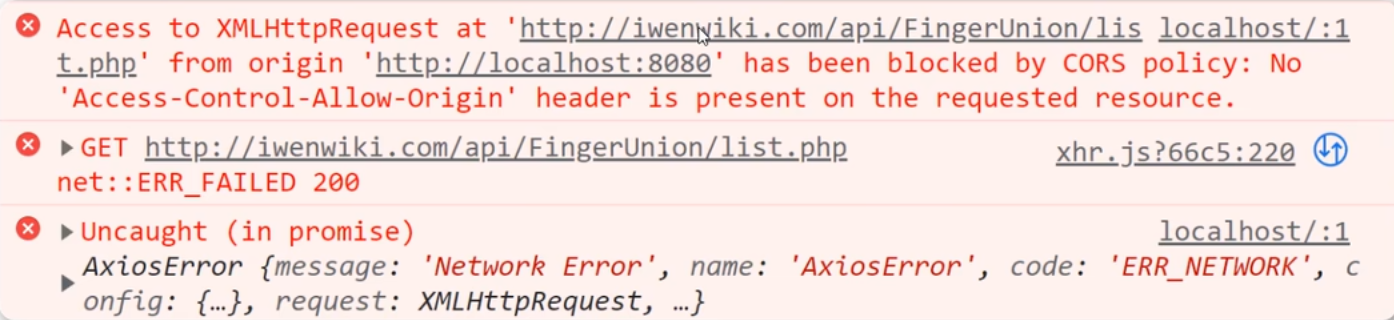
网络请求跨域解决方案
JS采取的是同源策略
同源策略是浏览器的一项安全策略,浏览器只允许js 代码请求和当前所在服务器域名,端口,协议相同的数据接口上的数据,这就是同源策略.
也就是说,当协议、域名、端口任意一个不相同时,都会产生跨域问题,所以又应该如何解决跨域问题呢
跨域错误提示信息
目前主流的跨域解决方案有两种:
- 后台解决:cors
- 前台解决:proxy
1 | devServer: { |
温馨提示
解决完跨域配置之后,要记得重启服务器才行哦!
Vue引入路由配置
在Vue中,我们可以通过vue-router路由管理页面之间的关系
Vue Router 是 Vue.js 的官方路由。它与 Vue.js 核心深度集成,让用 Vue.js 构建单页应用变得轻而易举
在Vue中引入路由
第一步:安装路由 npm install --save vue-router
第二步:配置独立的路由文件
1 | // index.js |
第三步:引入路由到项目
1 | // main.js |
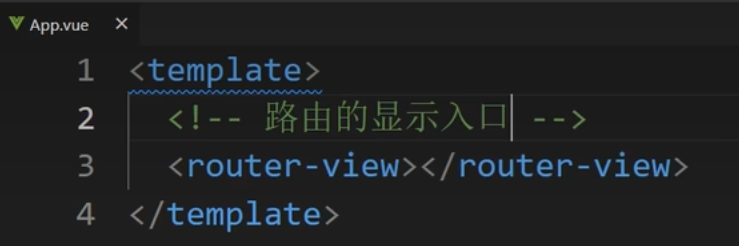
第四步:指定路由显示入口 <router-view/> 在app.vue中设置
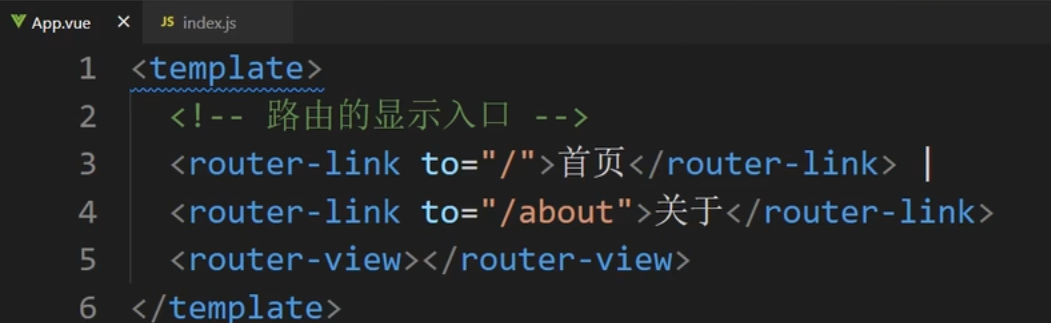
第五步:指定路由跳转
1 | <router-link to="/">Home</router-link> | |
路由传递参数
页面跳转过程中,是可以携带参数的,这也是很常见的业务
例如:在一个列表项,点击进入查看每个列表项的详情
第一步:在路由配置中指定参数的key
1 | { |
第二步:在跳转过程中携带参数
1 | <li><router-link to="/list/内蒙">内蒙旅游十大景区</router-link></li> |
第三步:在详情页面读取路由携带的参数
1 | <p>{{ $route.params.name }}城市旅游景区详情</p> |
嵌套路由配置
路由嵌套是非常常见的需求----->一般的后台管理系统的页面都是如此,包含多级子导航
第一步:创建子路由要加载显示的页面
第二步:在路由配置文件中添加子路由配置
1 | { |
第三步:指定子路由显示位置<router-view></router-view>
第四步:添加子路由跳转链接
1 | <router-link to="/news/baidu">百度新闻</router-link> | |
第五步:重定向配置 redirect:"/news/baidu"
1 | { |
子导航是没有数量限制的,只要在想要的页面下继续添加children方法就行,要做好重定向的设置,
Vue状态管理(Vuex)
Vuex 是一个专为 Vue.js 应用程序开发的状态管理模式 + 库。它采用集中式存储管理应用的所有组件的状态,并以相应的规则保证状态以一种可预测的方式发生变化。
简单来说,状态管理可以理解成为了更方便的管理组件之间的数据交互,提供了一个集中式的管理方案,任何组件都可以按照指定的方式进行读取和改变数据
引入Vuex的步骤
第一步:安装Vuex npm install --save vuex
第二步:配置Vuex文件
1 | //写法一: |
第三步:在主文件中(main.js)引入Vuex,与路由的用法是一样的
1 | import store from './store' |
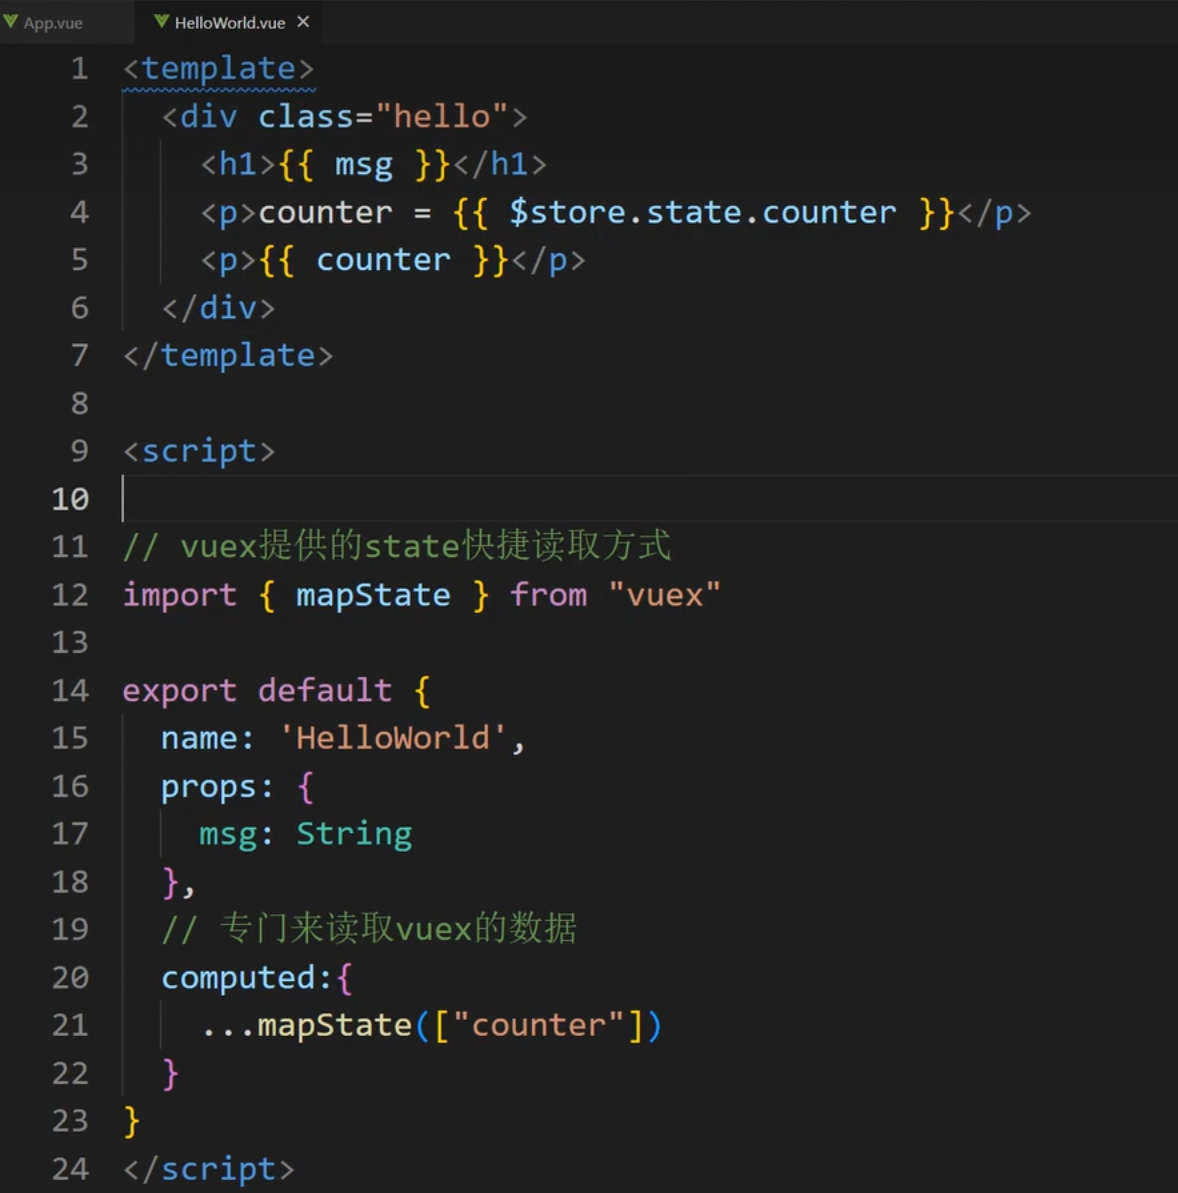
第四步:在组件中读取状态
1 | //方式一:在组件中读取的次数比较少 |
Vue状态管理核心(Vuex)
最常用的核心概念包含: State、Getter、Mutation、Action
Getter
对Vuex中的数据进行过滤
1 | import { createStore } from 'vuex' |
1 | import { mapState,mapGetters } from 'vuex'; |
Mutation
更改 Vuex 的 store 中的状态的唯一方法是提交 mutation。Vuex 中的 mutation 非常类似于事件:每个 mutation 都有一个字符串的事件类型 (type)和一个回调函数 (handler)。这个回调函数就是我们实际进行状态更改的地方,并且它会接受 state 作为第一个参数
1 | import { createStore } from 'vuex' |
1 | import { mapState,mapMutations } from 'vuex'; |
Action
Action 类似于 mutation,不同在于:
- Action 提交的是 mutation,而不是直接变更状态
- Action 可以包含任意异步操作
1 | import { createStore } from 'vuex' |
1 | import { mapState,mapMutations,mapGetters,mapActions } from 'vuex'; |
Vue3新特性1
Vue3是目前Vue的最新版本,自然也是新增了很多新特性
六大亮点
- Performance:性能更比Vue 2.0强。
- Tree shaking support:可以将无用模块“剪辑”,仅打包需要的。
- Composition API:组合API
- Fragment, Teleport, Suspense:“碎片”,Teleport即Protal传送门,“悬念”
- Better TypeScript support:更优秀的Ts支持
- Custom Renderer API:暴露了自定义渲染API
ref或者reactive
在2.x中通过组件data的方法来定义一些当前组件的数据
1 | data() { |
在3.x中通过ref或者reactive创建响应式对象
1 | import { ref,reactive } from "vue" |
methods中定义的方法写在setup()
在2.x中methods来定义一些当前组件内部方法
1 | methods:{ |
在3.x中直接在setup方法中定义并return
1 | setup() { |
setup()中使用props和context
在2.x中,组件的方法中可以通过this获取到当前组件的实例,并执行data变量的修改,方法的调用,组件的通信等等,但是在3.x中,setup()在beforeCreate和created时机就已调用,无法使用和2.x一样的this,但是可以通过接收setup(props,ctx)的方法,获取到当前组件的实例和props
1 | export default { |
Vue3新特性2
在setup中使生命周期函
你可以通过在生命周期钩子前面加上 “on” 来访问组件的生命周期钩子。
下表包含如何在 setup () 内部调用生命周期钩子
| Options API | Hook inside setup |
|---|---|
| beforeCreate | Not needed* |
| created | Not needed* |
| beforeMount | onBeforeMount |
| mounted | onMounted |
| beforeUpdate | onBeforeUpdate |
| updated | onUpdated |
| beforeUnmount | onBeforeUnmount |
| unmounted | onUnmounted |
1 | export default { |
Provide / Inject
- provide() 和 inject() 可以实现嵌套组件之间的数据传递。
- 这两个函数只能在 setup() 函数中使用。
- 父级组件中使用 provide() 函数向下传递数据。
- 子级组件中使用 inject() 获取上层传递过来的数据。
- 不限层级
1 | // 父组件 |
1 | // 子组件 |
Fragment
Fragment翻译为:“碎片”
- 不再限于模板中的单个根节点
1 | <template> |
Vue3加载Element-plus
Element,一套为开发者、设计师和产品经理准备的基于 Vue 2.0 的桌面端组件库
Element Plus 基于 Vue 3,面向设计师和开发者的组件库
安装Element-Plus
1 | npm install element-plus --save |
完整引用
如果你对打包后的文件大小不是很在乎,那么使用完整导入会更方便
1 | import { createApp } from 'vue' |
按需导入
按需导入才是我们的最爱,毕竟在真实的应用场景中并不是每个组件都会用到,这会造成不小的浪费
首先你需要安装unplugin-vue-components 和 unplugin-auto-import这两款插件
1 | npm install -D unplugin-vue-components unplugin-auto-import |
然后修改vue.config.js配置文件
1 | const { defineConfig } = require('@vue/cli-service') |
最后,可以直接在组件中使用
1 | <template> |
Vue3加载Element-plus的字体图标
Elment-plus不仅仅是提供了各种组件,同时还提供了一整套的字体图标方便开发者使用
安装icons字体图标
1 | npm install @element-plus/icons-vue |
全局注册
在项目根目录下,创建plugins文件夹,在文件夹下创建文件icons.js文件
1 | import * as components from "@element-plus/icons-vue"; |
引入文件
在main.js中引入icons.js文件
1 | import elementIcon from "./plugins/icons"; |
使用方式
接下来就可以直接在组件中引入使用了
1 | <el-icon class="expand" color="#409EFC" :size="30"> |